Proxmox Homelab - Storage
NFS Share
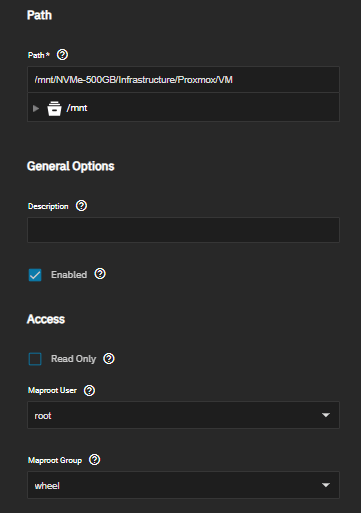
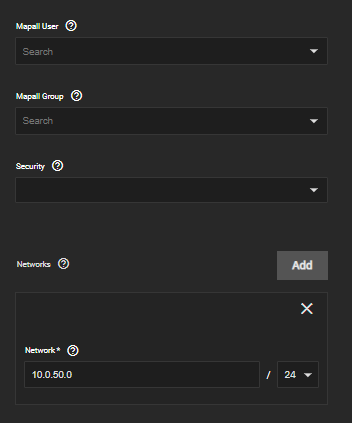
First we will set up the NFS shares from our TrueNAS Scale server. Configuration on the NFS server's side will depend on what you are using as a server. Under TrueNAS it's under Shares Unix (NFS) Shares. Hit the Add button and select the path to share from the Dataset. Under Networks, you can specify individual hosts, but since I have this on a closed network I just give it the full network. Make sure you are using the 10GB SAN network. Hit Advanced Options, and we'll need to put under Maproot User "root" and under Maproot Group "wheel".
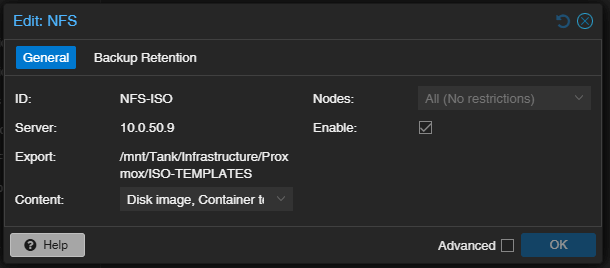
Now we'll add that NFS share to Proxmox. Go to Datacenter > Storage. Hit Add > NFS. Put the name you want for it in ID, put in the IP of your NFS server, and then when you click on export, if everything was done correctly, it should populate with your NFS share. Make sure under Content that Disk image and Container are selected. Hit add. I also have a separate share for templates and ISO files, so I add that share again and select ISO image and Container Template.
I like to test to make sure that permissions are set up correctly by going into the share on one of the hosts and trying to upload an ISO file or downloading an LXC template, and then testing the other Disk image share by creating a container. The whole process should take about a minute, and confirms that Proxmox has Read/Write permissions on the share. First go under one of your nodes and select the ISO NFS share. Under CT Templates, click the Templates button and select whichever template tickles yours fancy. As you can see I have Alpine, Debian, and Ubuntu. Click the Create CT in the upper right corner. Fill out a random Hostname and give it a root password select the NFS ISO storage and a template you already downloaded. Under Disks make sure the storage is set to your NFS share for Disk images. The only other thing you may need to change from defaults is under Network. Make sure the Bridge is set to management (or a tagged VLAN if you have that set up), and add a static IP address if you don't have a DHCP server setup in your Management network like me. Click through everything else. If it has the correct permissions everything should have worked and you will have a newly created LXC container working. Feel free to stop and delete the container.

Ceph
Note that I'm doing this with consumer hardware. This was useful for learning how Ceph works, but in practice was so slow it caused issues. I've seen used Samsung PM863 recommended as cheap enterprise SSDs to use so I'd probably go with that if I were to buy some in the future.
Ceph is something that I just started getting into. Ceph is a distributed storage system where the local drives are shared and replicated over the network. It's actually a lot more complicated than that and I'm kind of a noob with Ceph, so definitely look into it yourself because the way Ceph approaches handling data is very different than most other methods. For this we need at least 3 NMVe or SSD drives dedicated for Ceph, preferably close to the same size. From what I've read, Proxmox will automagically adjust the weight to compensate for any differences in the size of the drives, but it seems best practice to keep them the same size. I also may experiment with expanding Ceph with nodes that are not running Proxmox, so I may end up not having it automatically calculate the weight anyways.
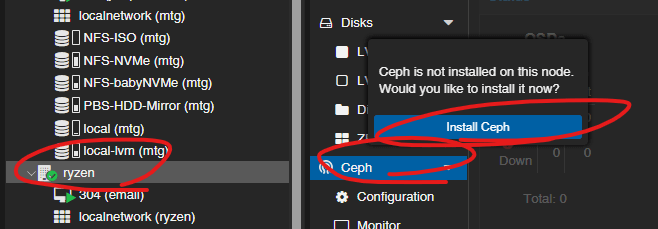
I followed this video to help guide myself along the basic setup for Ceph. Ceph does not install along with Proxmox, but there is a section for it we can go to which will do that now. Go to each host and there should be a section labeled Ceph. Click on it and it will prompt you to install it. On the Installation box that pops up, change the repository to No-Subscription and start the installation. A console will open up, just type "y" and enter and it will install. Click Next after it says Ceph installed successfully. Under configuration change the network to the SAN. Click through the rest of the installer and Ceph installation is complete on the first host. For installation on the last two nodes, it should automatically pick up the configuration and display "Configuration already initialized".
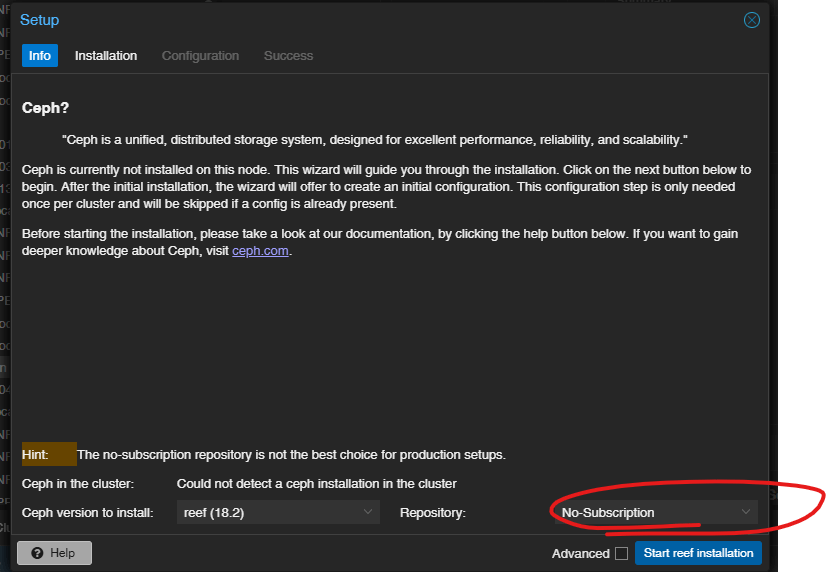

Now that we have Ceph installed on each of our hosts, we'll want to set up the OSDs - Object Storage Devices. Keeping things simple, for this each hard drive equals one OSD. Go into each host and under Ceph > OSD choose "Create: OSD" and select each drive that is dedicated to Ceph. After all drives are added you should see them all listed under OSD. You may need to refresh after a few seconds for it to show them as up.
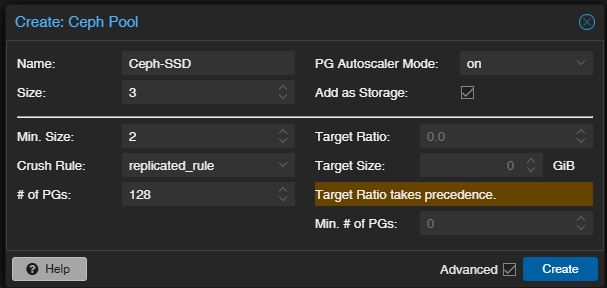
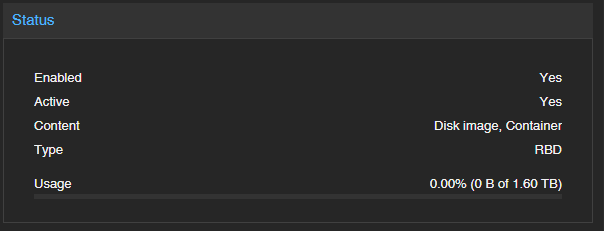
Now we can create the Pool for our VMs. Go to Ceph > Pools under one of the hosts and press the Create button. Give the pool a name and leave everything else as default. What this is doing is creating a pool which will replicate across all hosts. In my homelab, you can see 1.6TB total space in Ceph. This is because each of my 3 hosts have at least 3 drives of about 500GB each. The 3 drives combined make up about 1.5TB, and then the data replicates to each host. Now we should be able to create VMs on the Ceph storage. Feel free to create an LXC like we did earlier on the Ceph storage to test.
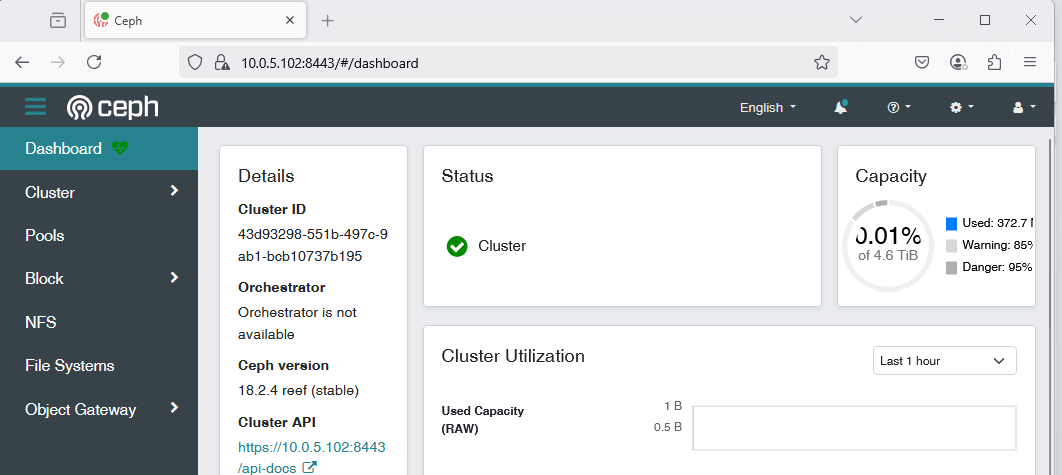
One other thing I like to do is install the Ceph dashboard on one of my hosts. This is not necessary, but it something I like to do because it gives more details and you can do more in it than the Proxmox interface. We'll need to install the dashboard on one of the hosts and then create a Ceph dashboard admin user. First go to the Shell of whichever host you want to use. First we install and enable the dashboard:
apt install ceph-mgr-dashboard
ceph mgr module enable dashboard
Next we create a certificate to access the dashboard webpage:
ceph dashboard create-self-signed-cert
openssl req -newkey rsa:2048 -nodes -x509 -keyout /root/dashboard-key.pem -out /root/dashboard-crt.pem -sha512 -days 3650 -subj
ceph config-key set mgr/dashboard/key -i /root/dashboard-key.pem
ceph config-key set mgr/dashboard/crt -i /root/dashboard-crt.pem
Now we need to create an admin user to be able to access the dashboard. When we do this, Ceph will want us to use a file with the password to pass to the ac-user-create command:
echo "ADMIN PASSWORD" > /root/cephdashpass.txt
ceph dashboard ac-user-create -i /root/cephdashpass.txt Admin User administrator
Now that we created the user we can go to port 8443 on the host that we installed the dashboard on:
High Availability
Now that we have shared storage of either and NFS share or Ceph, we can set up HA. First go to Datacenter > HA > Groups. First, we'll create a HA group so that VMs can fail over to any of the hosts. Select create, give it a name make sure all 3 of your hosts are selected and keep everything else as default. Click Create, then go back to HA and under Resources click Add. Select the VM you want in HA and change the Group to the one you just created, then Add. Do this with each VM you want in HA.
In my setup, I have a few hosts that I want to only failover to another specific host. For example, I have a VM that has a video card passed through, and I would only want to go to another host with a video card. So for that, we'll go back to HA > Groups and create a new group. This time, I'll name the group "GPU", check "restricted" and select only the hosts that have a video card. Back under HA, when I add the VM that has the video card passed to it, I change the group to "GPU". Now that VM will only fail over to that specific host with the other card.
